
HaloPSA Integration Guide
HaloPSA is a cloud-based professional services automation platform built for managed service providers and IT service teams. It brings ticketing, contract management, billing, projects and client relationships together in a single system, supported by flexible workflows and automation. TaskCall's HaloPSA integration combines the strengths of both platforms to automatically synchronize tickets and incidents bi-directionally, ensuring urgent issues reach the right agents immediately. This connected workflow helps service teams respond faster, minimize client downtime, and consistently meet their service level commitments.
Pricing Plans
TaskCall's HaloPSA integration is only available on the Business and Digital Operations pricing plans.
Pointers
- Incidents can be created in TaskCall from HaloPSA through webhook.
- Tickets can be created in HaloPSA from TaskCall manually/automatically.
- Tickets and incidents will sync up automatically.
- Multiple services can be integrated with the same HaloPSA account. It gives you the flexibility to dictate how tickets will be created in HaloPSA from TaskCall.
- The integration can only be set up by a user with admin rights.
- In HaloPSA an application has to be created to enable the integration.
In HaloPSA - Get the necessary credentials
An access token will be needed to authorize requests from TaskCall to create and update tickets in HaloPSA. To do that we need client ID and client secret. To generate a client id and secret, follow these steps:
- Log into your HaloPSA account.
- Go to Configuration > Integrations > Halo API.
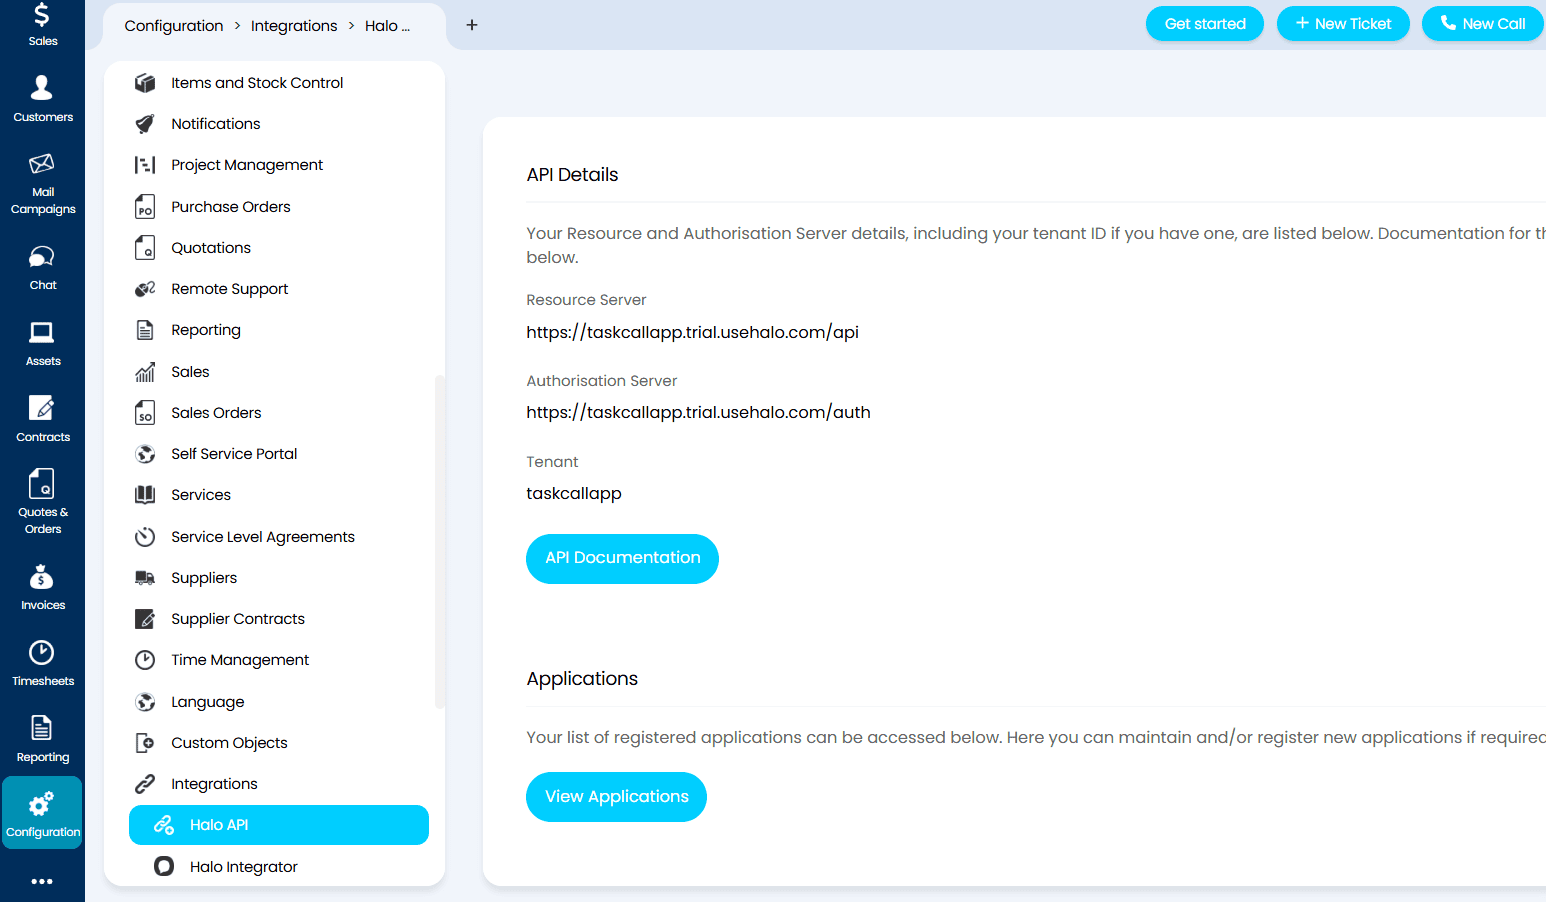
- Click on View Application. In the next page, click on the New button on the top right corner.
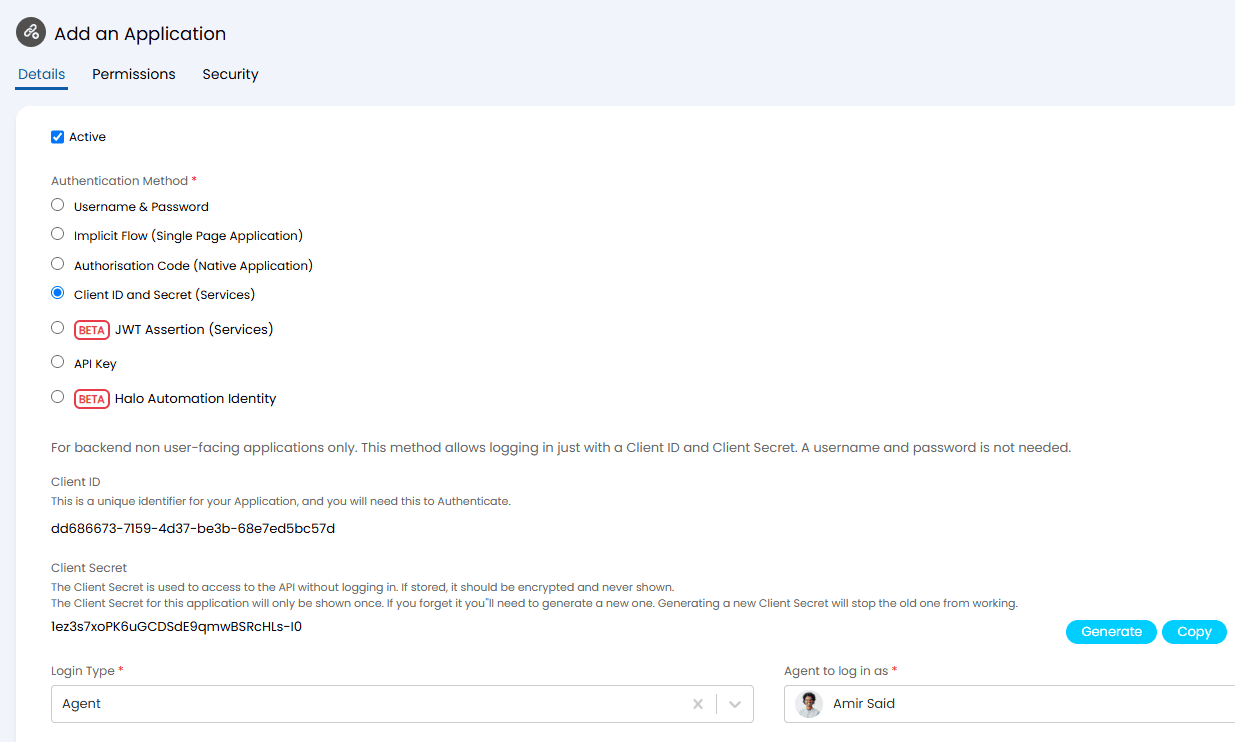
- Give the application a name (e.g. TaskCall). Select Client Id and Secret (Services) as the authentication method. Set the login type as Agent and select an agent to login as for this application. When TaskCall will create a ticket in HaloPSA, it will be logged as having been created by this agent. Hence, you may want to create a separate agent for this purpose.
Copy the Client ID and Client Secret that have already been generated for the application. They will be needed to set up the integration in TaskCall.
- Move over to the Permissions tab. Give the application the read:tickets, edit:tickets and read:customers permissions only.
- Click Save to create the application.
In TaskCall - Configure Integration
In TaskCall you will define how HaloPSA tickets will be created and synced up with TaskCall incidents.
- Go to Configurations > Integrations. Click New Integration.
- Select the HaloPSA integration.
- Give the integration a name.
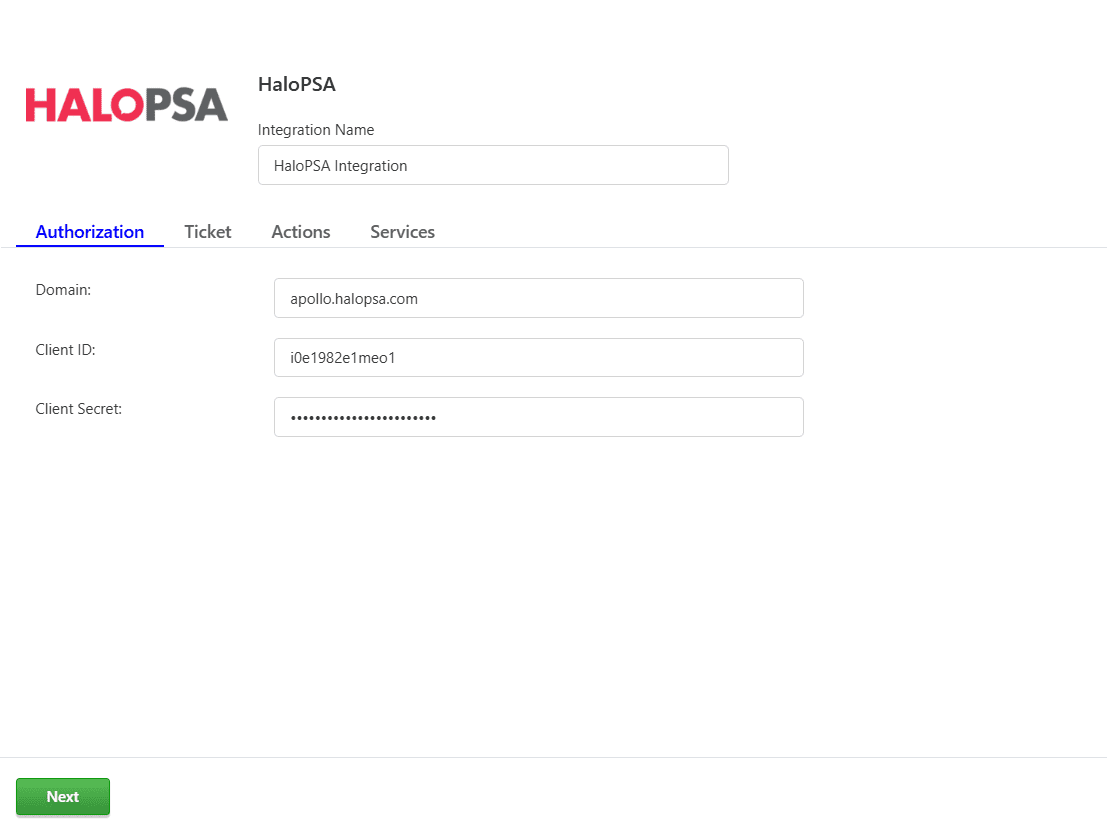
- In the Authorization section, provide your HaloPSA API domain (e.g. apollo.halopsa.com), client ID and client secret (as generated by the HaloPSA application you created earlier). The client ID and secret will not be viewable again. They are stored securely by TaskCall and are only used for making API calls to sync up tickets and incidents.
- Click Next.
- In the Ticket section define how TaskCall will create HaloPSA tickets.
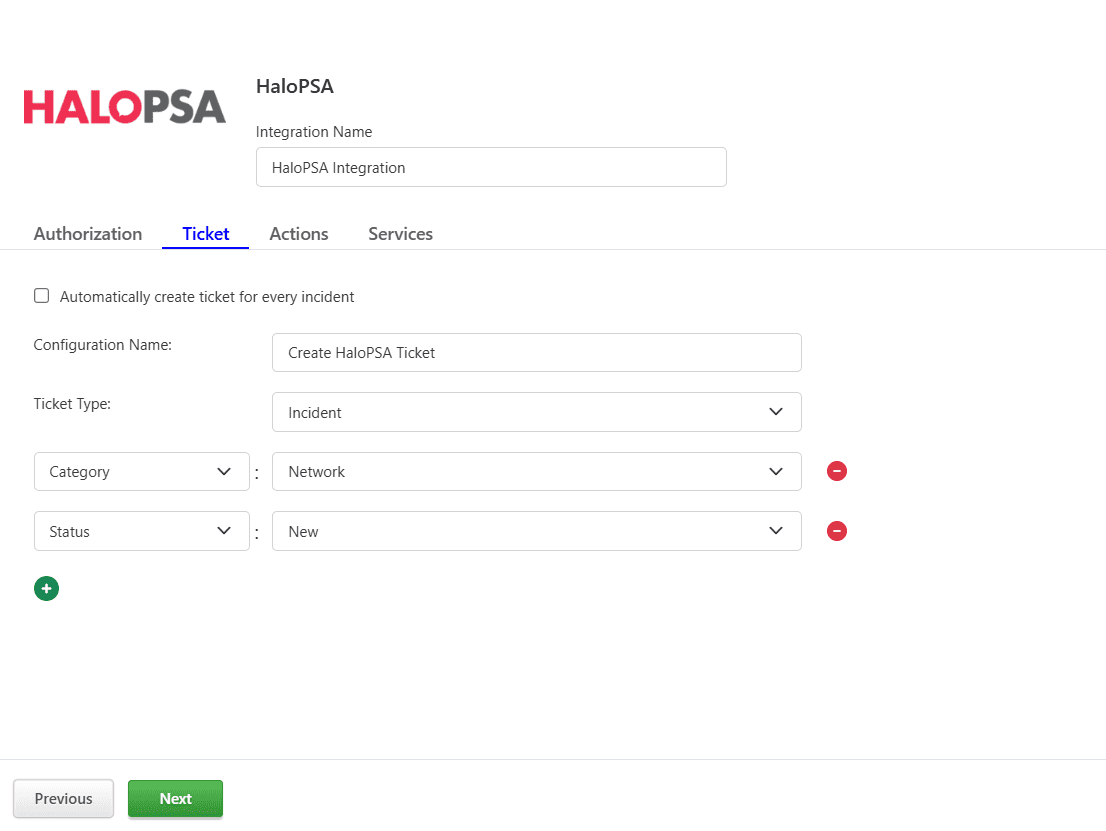
- Select if you would like toAutomatically create a HaloPSA ticket for every incident. If you do not select this option, you will be able to create tickets manually when needed. In this case, a custom button will be displayed on the Incident details page with the configuration name you will provide next. The button will only be displayed for incidents on services that are associated with this integration.
If you do not want a ticket for every incident, you can still configure a workflow to create a ticket automatically when certain conditions are met. - Give it a Configuration Name (e.g. Create HaloPSA Ticket). This name will be given to the custom button that will be displayed for you on the Incident details page if you choose to create the tickets manually. This button will be displayed in the dropdown More in the incident actions button panel on the page.
- Select the Ticket Type.
- Add any other fields and their corresponding values that you would like TaskCall to send with the default ticket fields. All required fields for your selected ticket type should be added here. Otherwise, TaskCall's attempts to create tickets will be rejected by HaloPSA.
- Select if you would like toAutomatically create a HaloPSA ticket for every incident. If you do not select this option, you will be able to create tickets manually when needed. In this case, a custom button will be displayed on the Incident details page with the configuration name you will provide next. The button will only be displayed for incidents on services that are associated with this integration.
- Click Next.
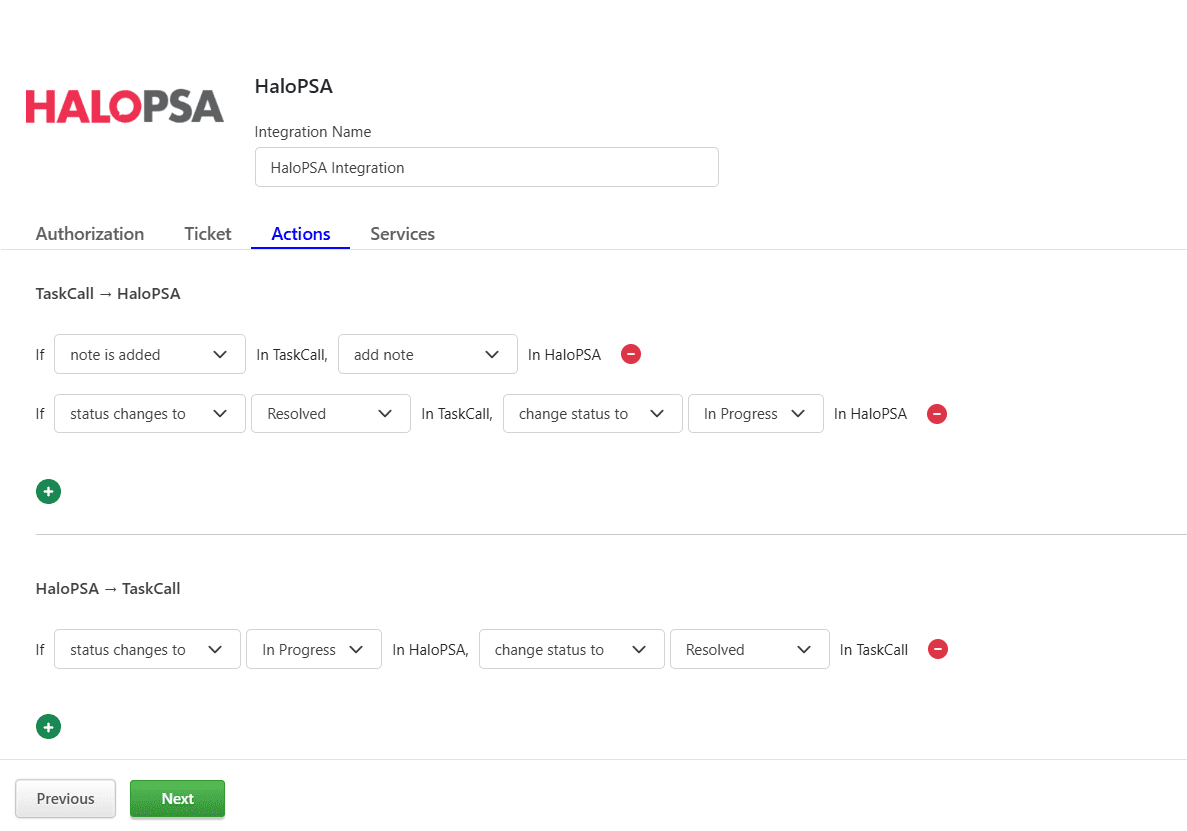
- In the Actions section, select the actions that should sync up between TaskCall and HaloPSA. Currently the supported actions include, status changes, priority changes and note additions. Click Next when you are done.
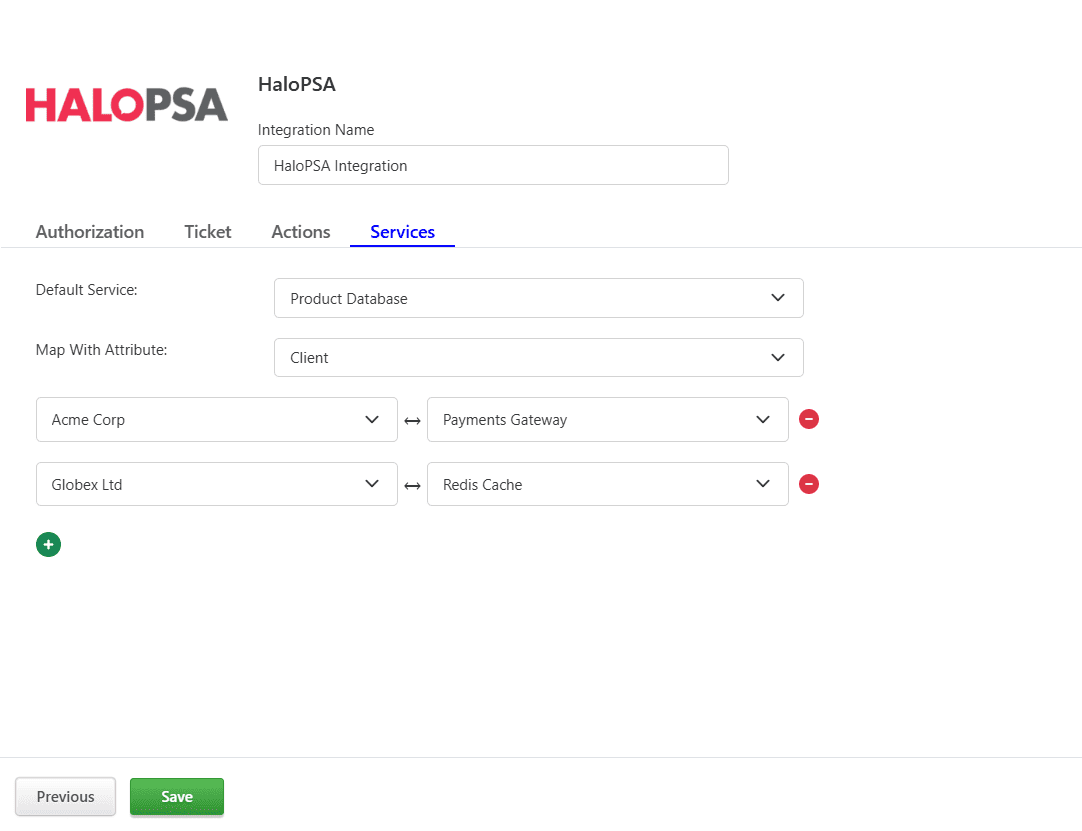
- In the Services section, select the services tickets will be created from (TaskCall) and incidents will be created into (from HaloPSA). You can select a HaloPSA attribute to map with TaskCall services. TaskCall will utilize this mapping to set the value of the selected attribute when creating a ticket. When an alert is received from HaloPSA, TaskCall will utilize the same mapping to select the service to create the incident in. This reduces the need to use Conditional Routing to route to different services.
- Click Save when done.
At this stage you can start creating and syncing up tickets in HaloPSA from TaskCall incidents. If you would like to create incidents in TaskCall from HaloPSA, then please move on to the next section.
Set-up Automatic Triggers from HaloPSA to TaskCall
HaloPSA webhooks can be used to automatically trigger incidents and update them in TaskCall. The integration URL that was generated by TaskCall during the integration setup will be the webhook endpoint.
- In your TaskCall account, go to Configurations > Integrations. Copy the Integration URL of your HaloPSA integration.
- Then in your HaloPSA account, go to Configuration > Integrations > Webhooks. Click the New button on the top right corner.
- Configure the webhook:
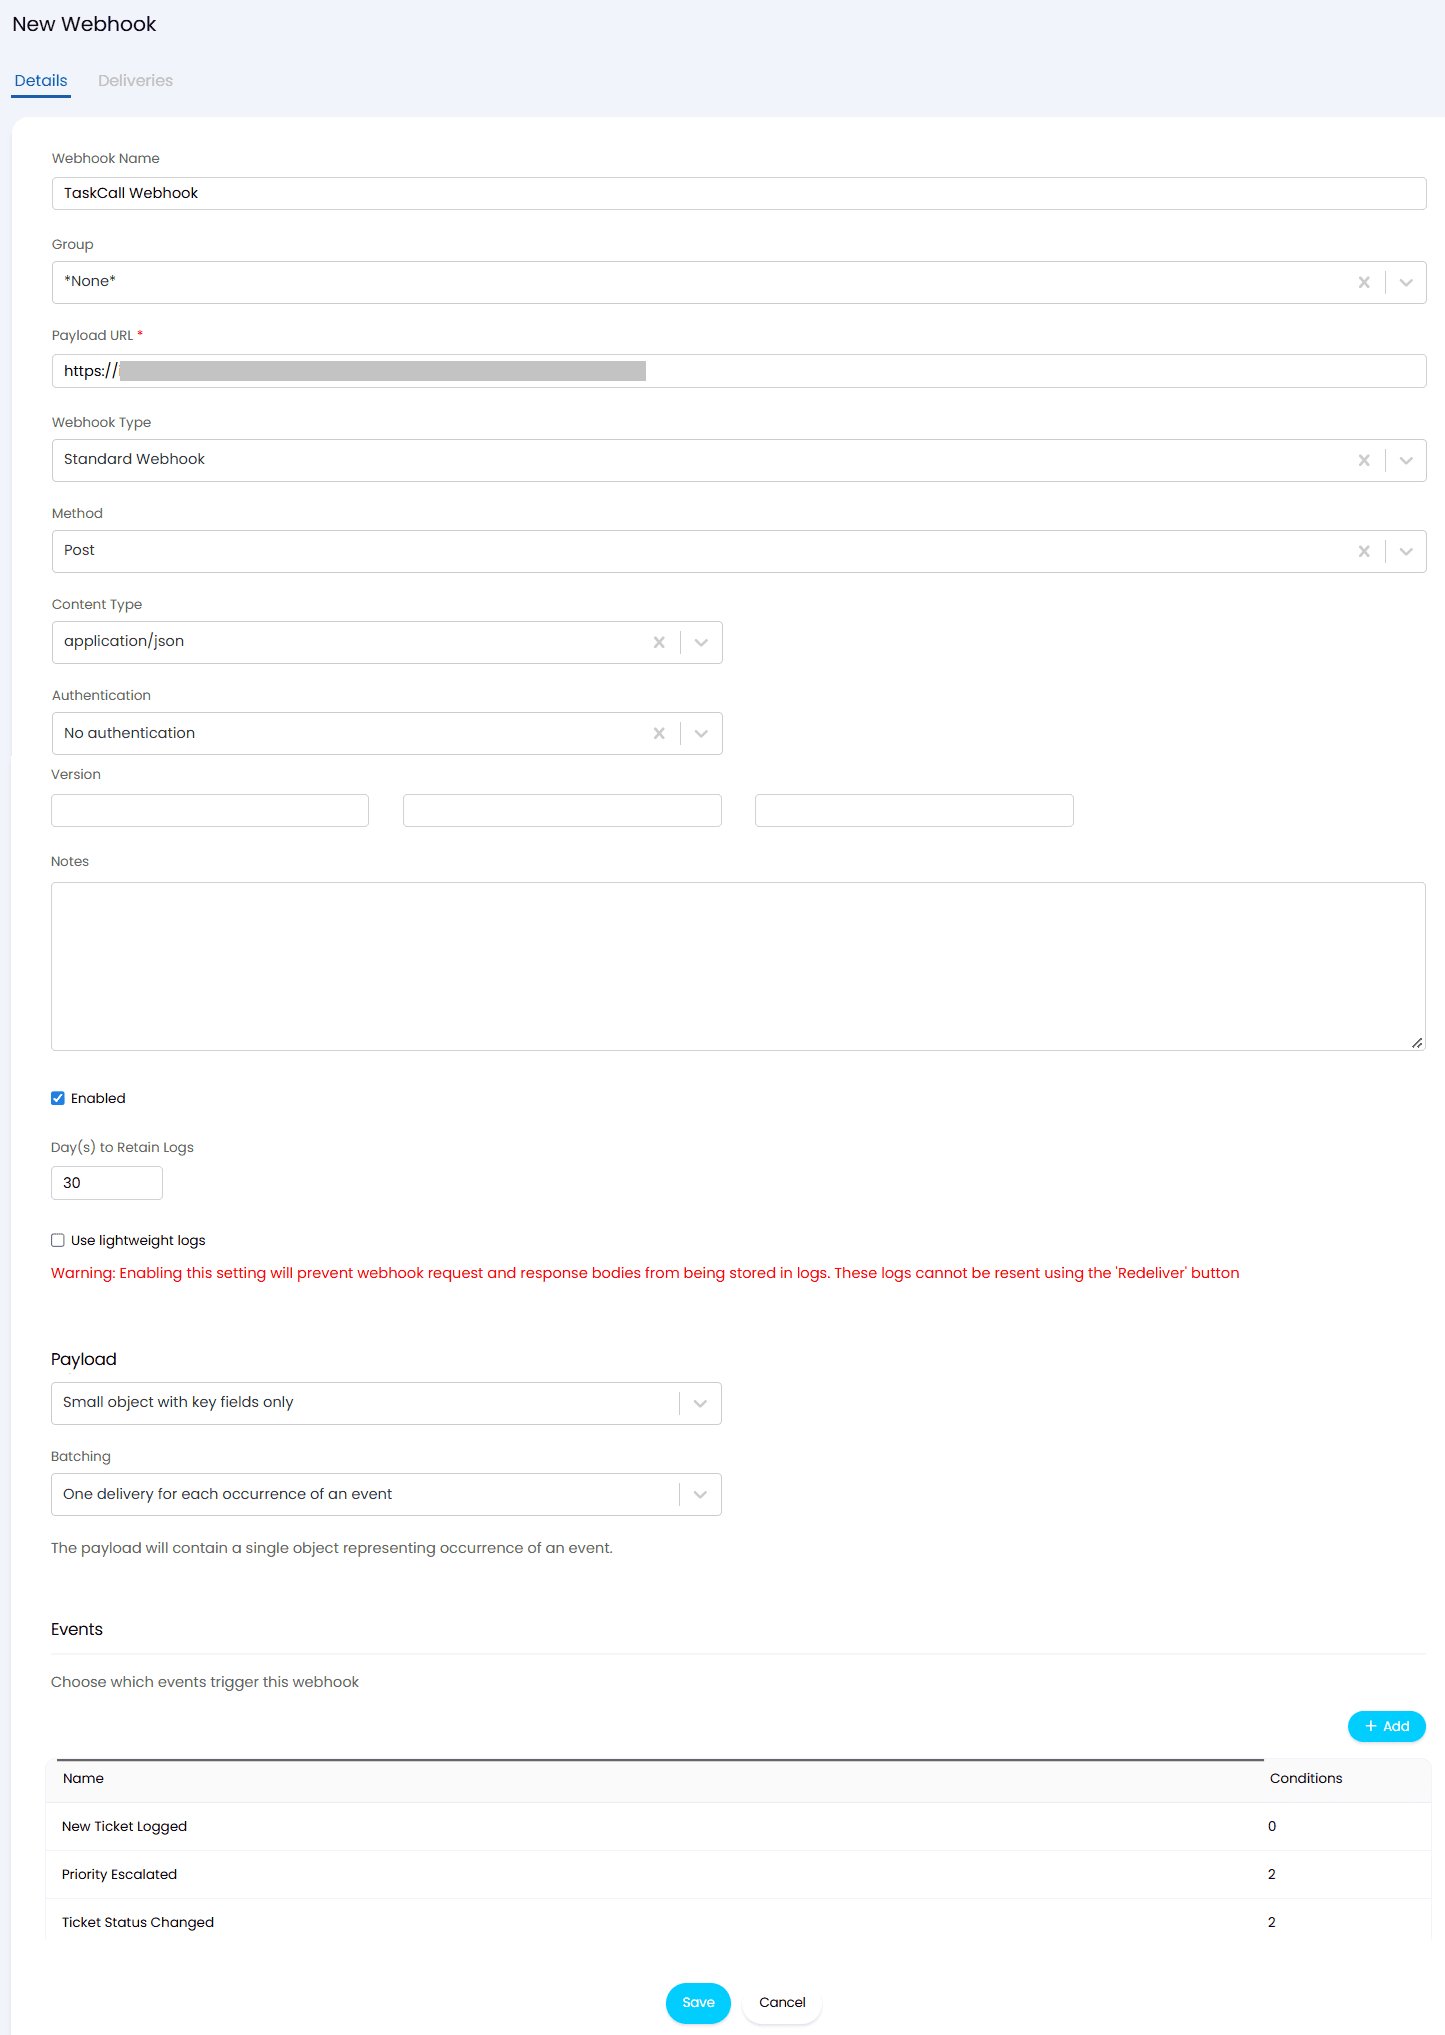
- Webhook Name: Give the webhook a name (e.g. TaskCall Webhook).
- Payload URL: Paste the Integration URL you copied over from TaskCall.
- Webhook Type: Standard Webhook
- Method: Post
- Content Type: application/json
- Authentication: No authentication
- Payload: Select Small object with key fields only and batch it as One delivery for each occurrence of an event.
- Events: Select these events - New Ticket Logged, Priority Escalated and Ticket Status Changed.
- Click Save. That's it!
Your integration is now ready to bi-directionally sync up HaloPSA tickets and TaskCall incidents.
How to manually create HaloPSA ticket?
When you configure the integration to create HaloPSA tickets manually, TaskCall displays a custom button on the incident details page with configuration name you provided. This button is only shown on services the integration is associated with. The button can be found in the More actions dropdown towards the top of the page. A ticket will be created in HaloPSA whenever this button is clicked.
Where to find the synced tickets?
Once a TaskCall incident is synced with a HaloPSA ticket, the ticket ID is displayed on the upper panel on the incident details page next to the Synced with label.