
WhatsUp Gold Integration Guide
WhatsUp Gold is a Windows based IT infrastructure and monitoring platform that allows system administrators to constantly monitor devices across their network for availability and performance. TaskCall integrates with WhatsUp Gold to provide real-time incident response. Device outages and performance degradation are passed on to TaskCall through webhooks, from where on-call responders are assembled to address the incident before it has any further impact. The incidents automatically resolve when the monitors are back up, making the response process even more manageable.
Pointers
- The integration is between a TaskCall service and WhatsUp Gold.
- This integration only receives alerts in TaskCall from WhatsUp Gold.
- TaskCall will automatically identify alerts that are the same and group them together into one incident.
- Incidents will automatically resolve when devices and monitors are back up in WhatsUp Gold.
In TaskCall
- Go to Configurations > Services . Select the service you want to integrate with.
- Once you are on the Service details page, go to the Integrations tab. Click on New Integration.
- Give the integration a name.
- From the integration types, select the top radio button indicating that you are trying to use a built-in integration.
- From the list of built-in integrations, select WhatsUp Gold.
- Click Save.
- Keep note of the Integration URL that is issued for the integration. This will be needed later.
In WhatsUp Gold
The integration requires WhatsUp Gold to send a webhook to TaskCall with alert details. WhatsUp Gold does not allow a webhook to be created natively that has access to alert context. These details have to be logged in a file first. A script then has to be added to read that file and dispatch the webhook. While a single script can handle the process, we will need to create two actions to log the alert details - one for when the device/monitor goes down and one for when it comes back up. Follow through with the steps listed below to configure your account to handle this flow.
- First, create an action to log changes when devices/monitors go down.
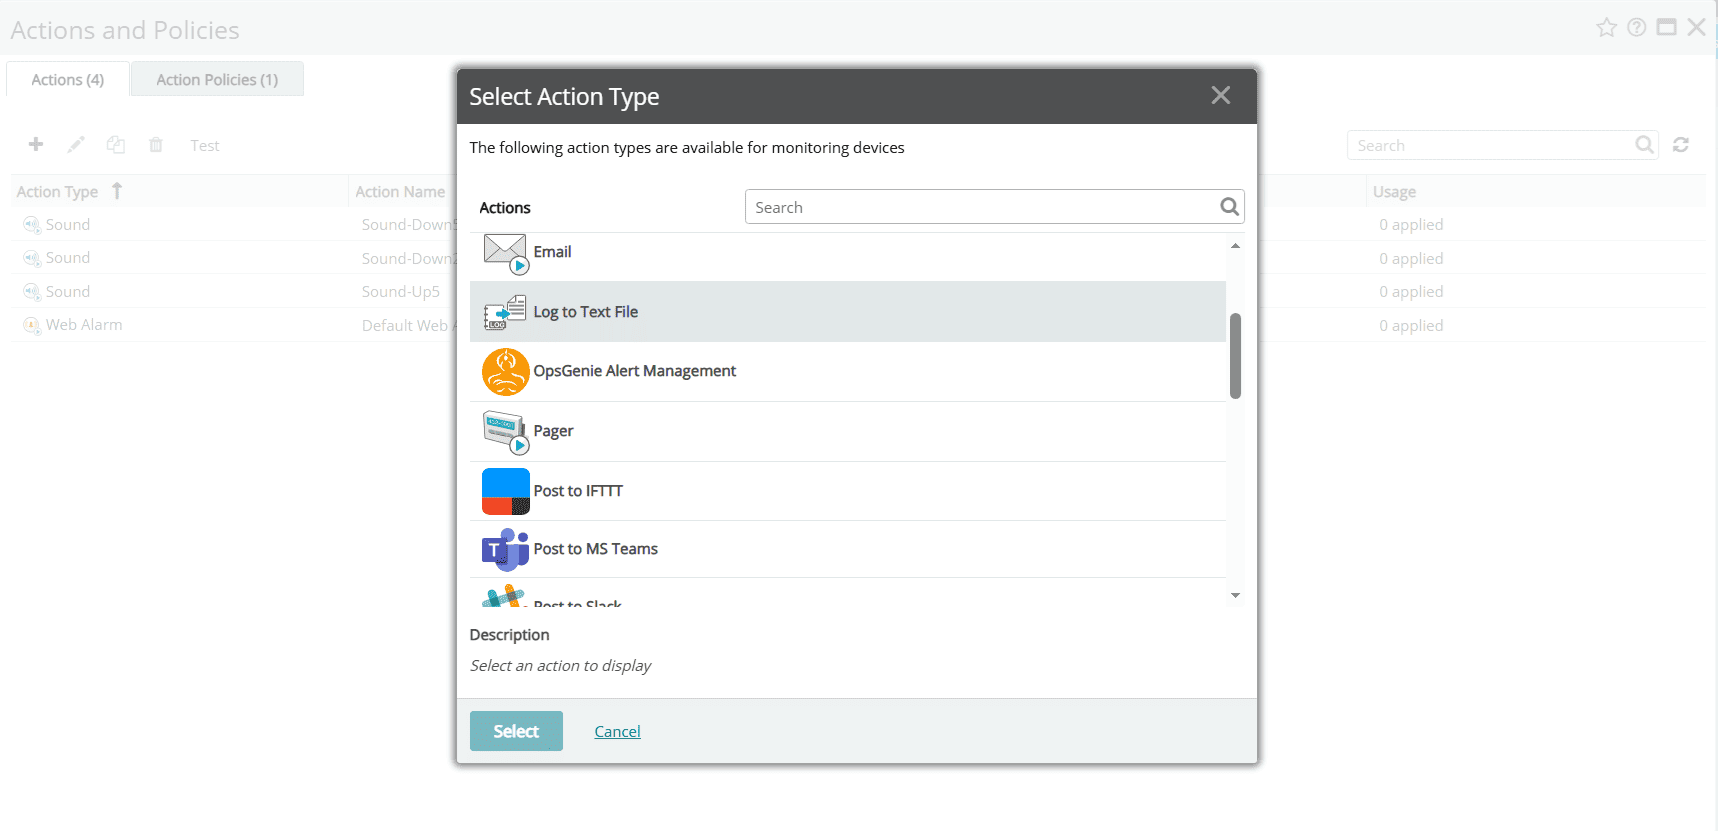
- In WhatsUp Gold, go to Settings > Actions & Alerts > Actions and Policies.
- Click the + button under the Actions tab on the modal that opens up to create a new action. Select the Log to Text File action.
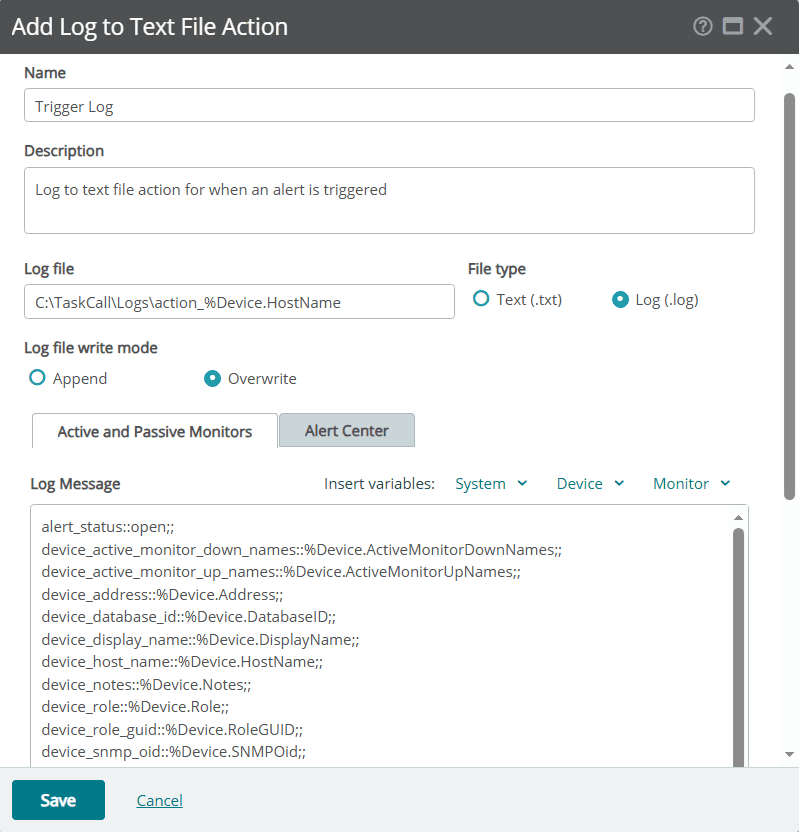
- Complete the action fields:
- Name the action Trigger Log and give it a description.
- Set the location for the log file to C:\TaskCall\Logs\action_%Device.HostName.log and the file type to Log(.log).
- Set the write mode to Overwrite.
- In the Active and Passive Monitors tab copy and paste the following logging template.
alert_status::open;;
device_active_monitor_down_names::%Device.ActiveMonitorDownNames;;
device_active_monitor_up_names::%Device.ActiveMonitorUpNames;;
device_address::%Device.Address;;
device_database_id::%Device.DatabaseID;;
device_display_name::%Device.DisplayName;;
device_host_name::%Device.HostName;;
device_notes::%Device.Notes;;
device_role::%Device.Role;;
device_role_guid::%Device.RoleGUID;;
device_snmp_oid::%Device.SNMPOid;;
device_state::%Device.State;;
device_status::%Device.Status;;
device_type::%Device.Type;;
passive_monitor_display_name::%PassiveMonitor.DisplayName;;
passive_monitor_logged_text::%PassiveMonitor.LoggedText;;
active_monitor_argument::%ActiveMonitor.Argument;;
active_monitor_comment::%ActiveMonitor.Comment;;
active_monitor_name::%ActiveMonitor.Name;;
active_monitor_network_interface_address::%ActiveMonitor.NetworkInterfaceAddress;;
active_monitor_payload::%ActiveMonitor.Payload;;
active_monitor_state::%ActiveMonitor.State;;
- Click Save when you are done.
Test and give log folder permissions
WhatsUp Gold allows Log to Text actions to be tested from the Actions and Policies screen. Test if the action is executed as expected and the log file is created in the defined location. The folder that we have directed the logs to be written in may not exist in your server and WhatsUp Gold may not have the permissions to create the folder for you. If the test fails because of this then create the folder C:\TaskCall\Logs (and give it the necessary permissions if needed) and test again.
- Now, create an action to log changes when devices/monitors come back up. Follow through the same steps as above to create an action and set the values as shown below:
- Name the action Resolve Log and give it a description.
- Set the location for the log file to C:\TaskCall\Logs\action_%Device.HostName.log and the file type to Log(.log) (same as before).
- Set the write mode to Overwrite (same as before).
- In the Active and Passive Monitors tab copy and paste the following logging template. (This is almost the same as the trigger log template. Only the value of the alert_status field is different.)
alert_status::closed;;
device_active_monitor_down_names::%Device.ActiveMonitorDownNames;;
device_active_monitor_up_names::%Device.ActiveMonitorUpNames;;
device_address::%Device.Address;;
device_database_id::%Device.DatabaseID;;
device_display_name::%Device.DisplayName;;
device_host_name::%Device.HostName;;
device_notes::%Device.Notes;;
device_role::%Device.Role;;
device_role_guid::%Device.RoleGUID;;
device_snmp_oid::%Device.SNMPOid;;
device_state::%Device.State;;
device_status::%Device.Status;;
device_type::%Device.Type;;
passive_monitor_display_name::%PassiveMonitor.DisplayName;;
passive_monitor_logged_text::%PassiveMonitor.LoggedText;;
active_monitor_argument::%ActiveMonitor.Argument;;
active_monitor_comment::%ActiveMonitor.Comment;;
active_monitor_name::%ActiveMonitor.Name;;
active_monitor_network_interface_address::%ActiveMonitor.NetworkInterfaceAddress;;
active_monitor_payload::%ActiveMonitor.Payload;;
active_monitor_state::%ActiveMonitor.State;;
- With the logging actions in place, now create another action to execute the script that will create the webhook in TaskCall.
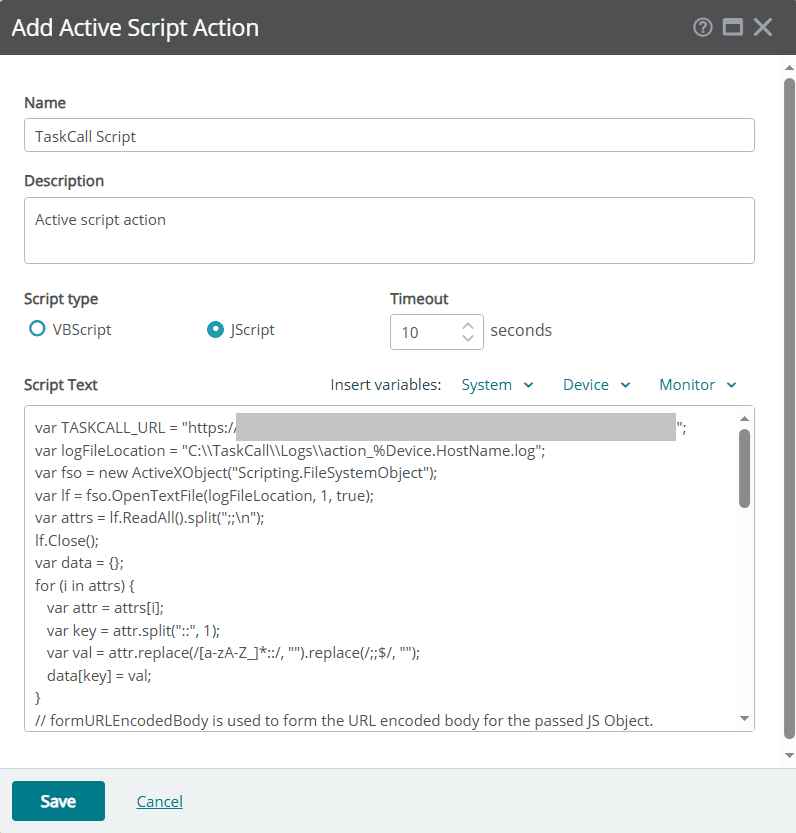
- From the choices of actions, select Active Script.
- Name the action TaskCall Script and add a description.
- Set the script type to JScript and the timeout to 10 seconds.
- Copy and paste the following script in the Script Text field. This script parses the log file, compiles it into a JSON format and sends it to TaskCall. Update the < INTEGRATION_URL > field in the script with the integration URL TaskCall generated for you.
var TASKCALL_URL = "< INTEGRATION_URL >";
var logFileLocation = "C:\\TaskCall\\Logs\\action_%Device.HostName.log";
var fso = new ActiveXObject("Scripting.FileSystemObject");
var lf = fso.OpenTextFile(logFileLocation, 1, true);
var attrs = lf.ReadAll().split(";;\n");
lf.Close();
var data = {};
for (i in attrs) {
var attr = attrs[i];
var key = attr.split("::", 1);
var val = attr.replace(/[a-zA-Z_]*::/, "").replace(/;;$/, "");
data[key] = val;
}
// formURLEncodedBody is used to form the URL encoded body for the passed JS Object.
function formURLEncodedBody(obj) {
var body = [];
for (i in obj) {
body.push(escape(i) + "=" + escape(obj[i]));
}
return body.join("&");
}
// sendToTaskCall is used to send the alert body to TaskCall
function sendToTaskCall(tcUrl, body) {
var strResult = "";
var returnCode = 0;
try {
var WinHttpReq = new ActiveXObject("WinHttp.WinHttpRequest.5.1");
WinHttpReq.Open("POST", tcUrl, false);
WinHttpReq.SetRequestHeader("Content-Type", "application/x-www-form-urlencoded");
WinHttpReq.SetRequestHeader("User-Agent", "TaskCall JScript/1.0 (compatible; Win32; WinHttp.WinHttpRequest.5)");
WinHttpReq.Send(body);
strResult = WinHttpReq.ResponseText;
strResult = "Script executed successfully! : " + strResult;
} catch (objError) {
strResult += "WinHTTP returned error: " + (objError.number & 0xFFFF).toString() + "\n\n";
strResult += objError.description;
strResult = "Script failed: " + strResult.toString();
}
if (this.Context) {
Context.SetResult(returnCode, strResult);
} else {
WScript.Echo("WARNING: The Script is not executed with the WhatsUp Gold Context. Please check your installation.");
WScript.Echo("ReturnCode: " + returnCode.toString());
WScript.Echo("Result: ", strResult);
}
}
var reqBody = formURLEncodedBody(data);
sendToTaskCall(TASKCALL_URL, reqBody);
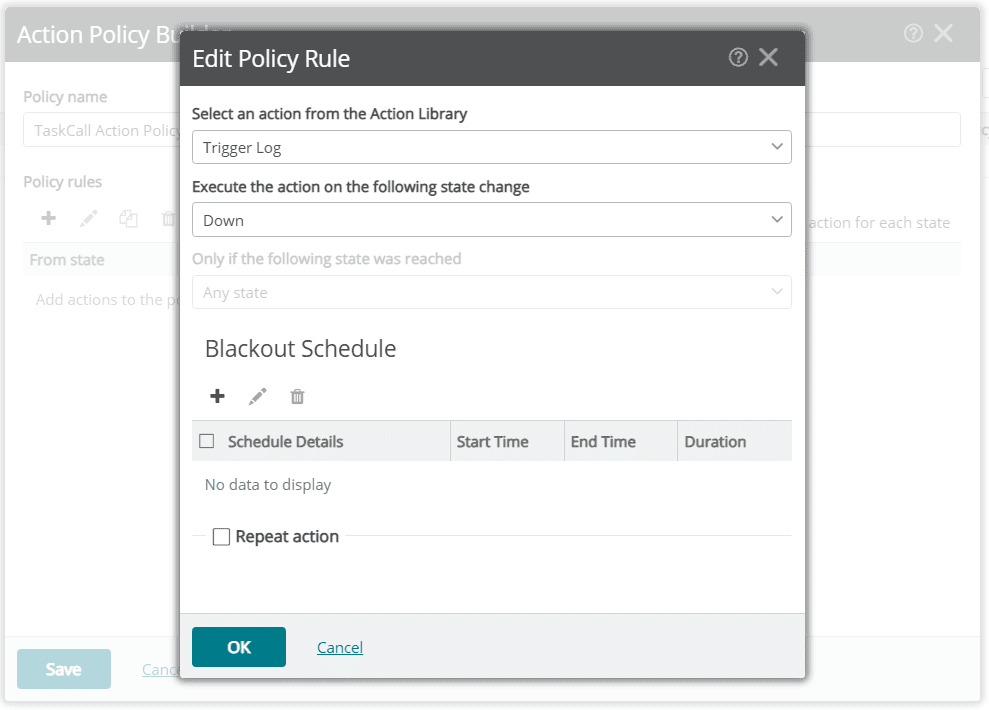
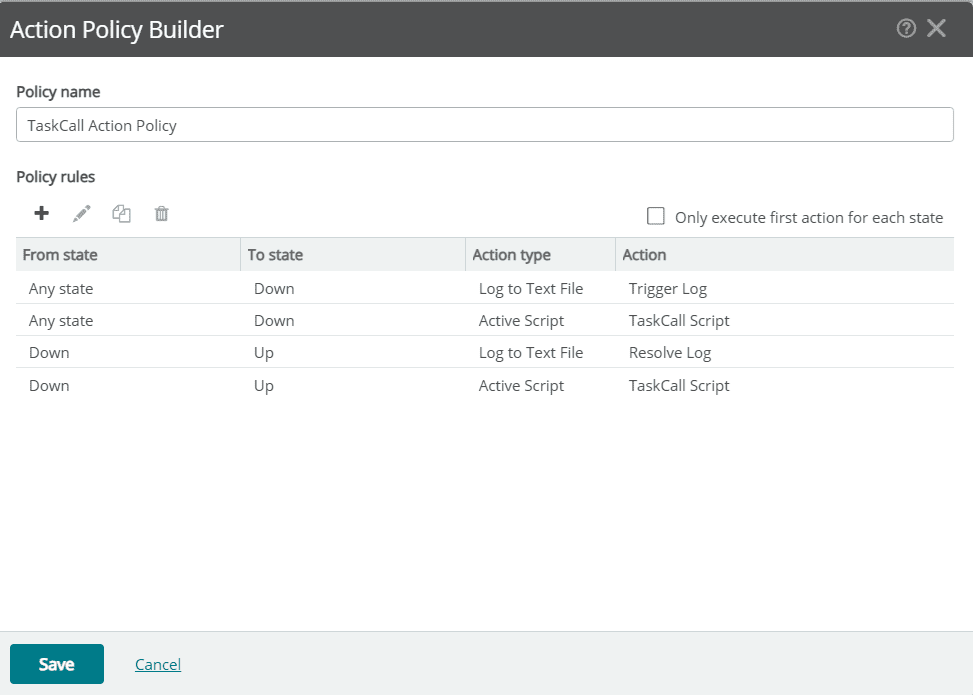
- With the actions defined, now create an action policy that will automatically trigger these actions. The Trigger Log should execute first when the devices/monitors are down, followed by the TaskCall Script action. The Resolve Log should also execute when the devices/monitors are back up, followed by the TaskCall Script action. To set this up, go to the Action Policies tab on the Actions and Policies screen. Click the + button to create a new policy. Give the policy a name like TaskCall Action Policy and add the following policy rules in the exact order shown here:
- Trigger Log - Configure it to execute when the state changes to Down.
- TaskCall Script - Configure it to execute when the state changes to Down.
- Resolve Log - Configure it to execute when the state changes to Up only if the previous state reached was Down.
- TaskCall Script - Configure it to execute when the state changes to Up only if the previous state reached was Down.
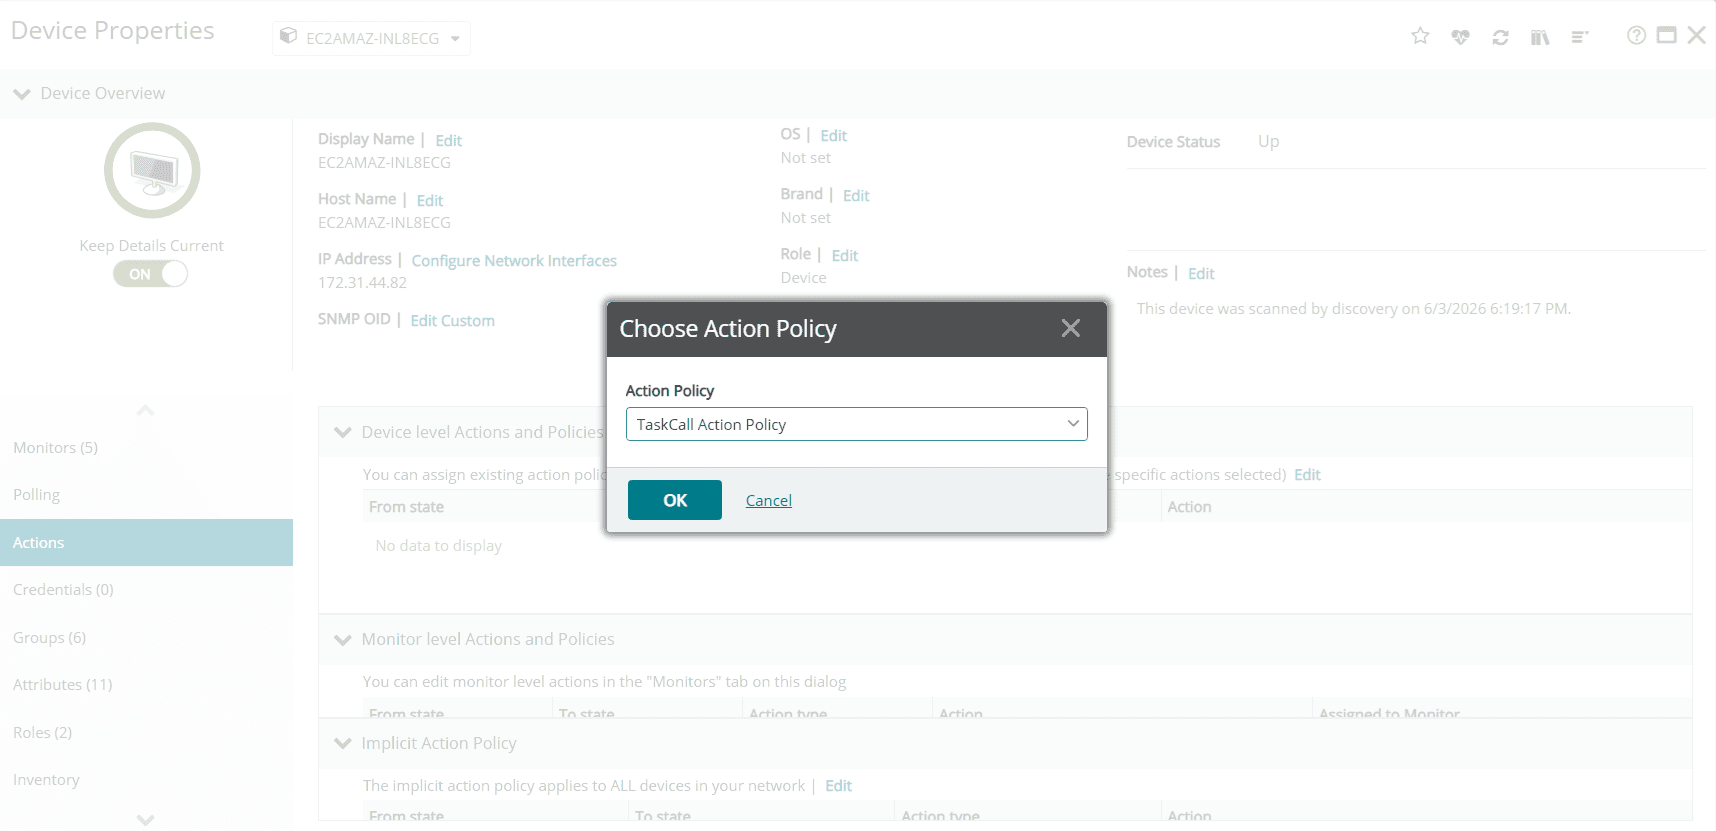
- With the policy saved, now it can be added to the devices for which you want to be notified in TaskCall.
- Navigate to your list of devices. Right click on the name of the device. From the dropdown shown, select Device Properties.
- Go to the Actions tab and edit the Device level Actions and Policies and set it to the TaskCall Action Policy you created in the last step.
And finally you are done! Try simulating a down state in one of the devices you have added the TaskCall Action Policy and ensure that an incident is created in TaskCall. The incident should automatically resolve once the device is back up.
On this page - With the actions defined, now create an action policy that will automatically trigger these actions. The Trigger Log should execute first when the devices/monitors are down, followed by the TaskCall Script action. The Resolve Log should also execute when the devices/monitors are back up, followed by the TaskCall Script action. To set this up, go to the Action Policies tab on the Actions and Policies screen. Click the + button to create a new policy. Give the policy a name like TaskCall Action Policy and add the following policy rules in the exact order shown here: