Manage Status Pages
External status pages allow organizations to control what gets posted and manage them separately from system incidents while staying on the same platform. While system incidents can be automatically posted on the status page if certain conditions are met, a human oversight can be added by mandating a final approval. The same process can be applied for manual incident posts and maintenance.
Templates can be stored in advance to publish posts faster. Subscribers can also be added directly (apart from self subscription) and notified when certain business services are impacted.
TaskCall Status Pages embody the core principles of incident response. Minimize the time to resolution by reducing interruptions for your DevOps team. Let them focus on the actual resolution, while automation handles communication with stakeholders.
Navigation in Status Pages
Multiple status pages can be maintained at the same time. To post on or manage a particular status page, select the page you want to access from the status pages listed in ITSM > External Status Pages.
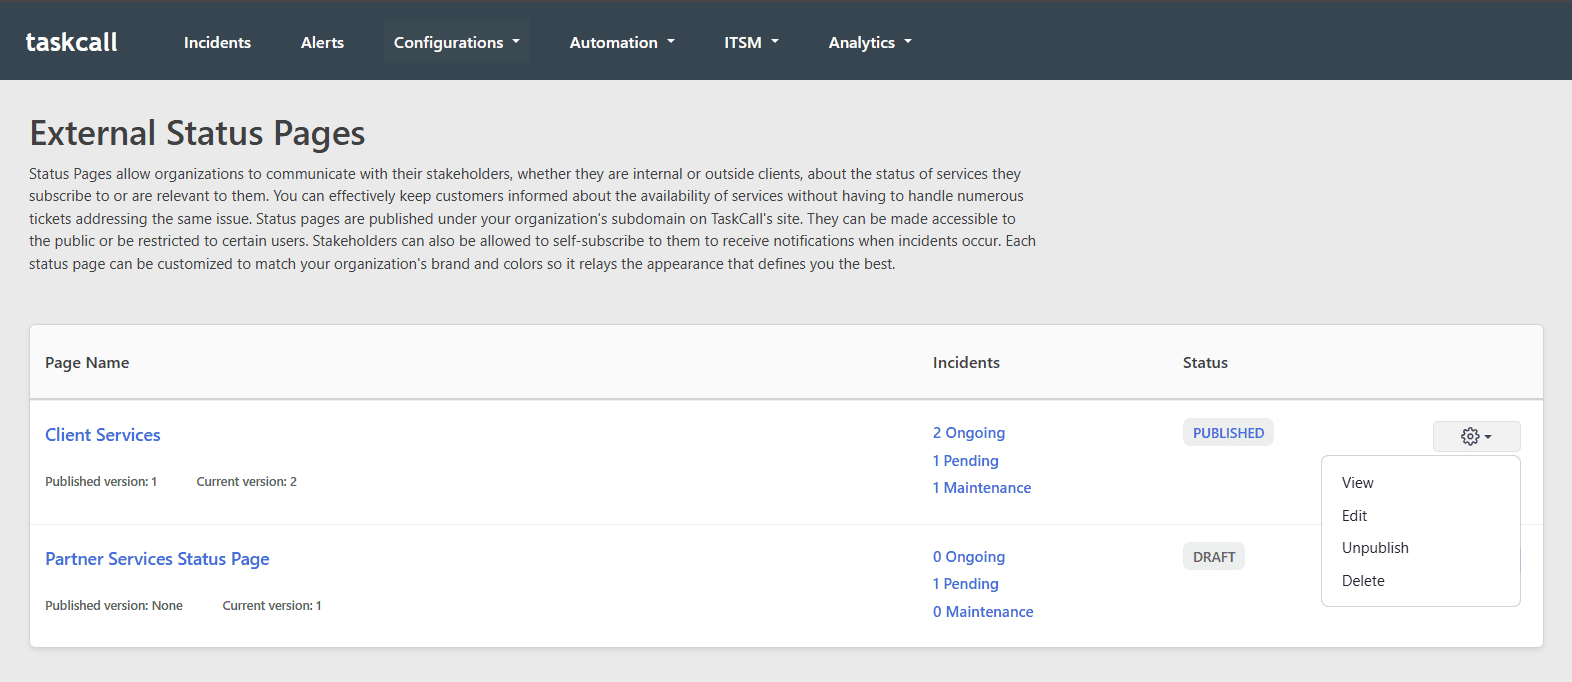
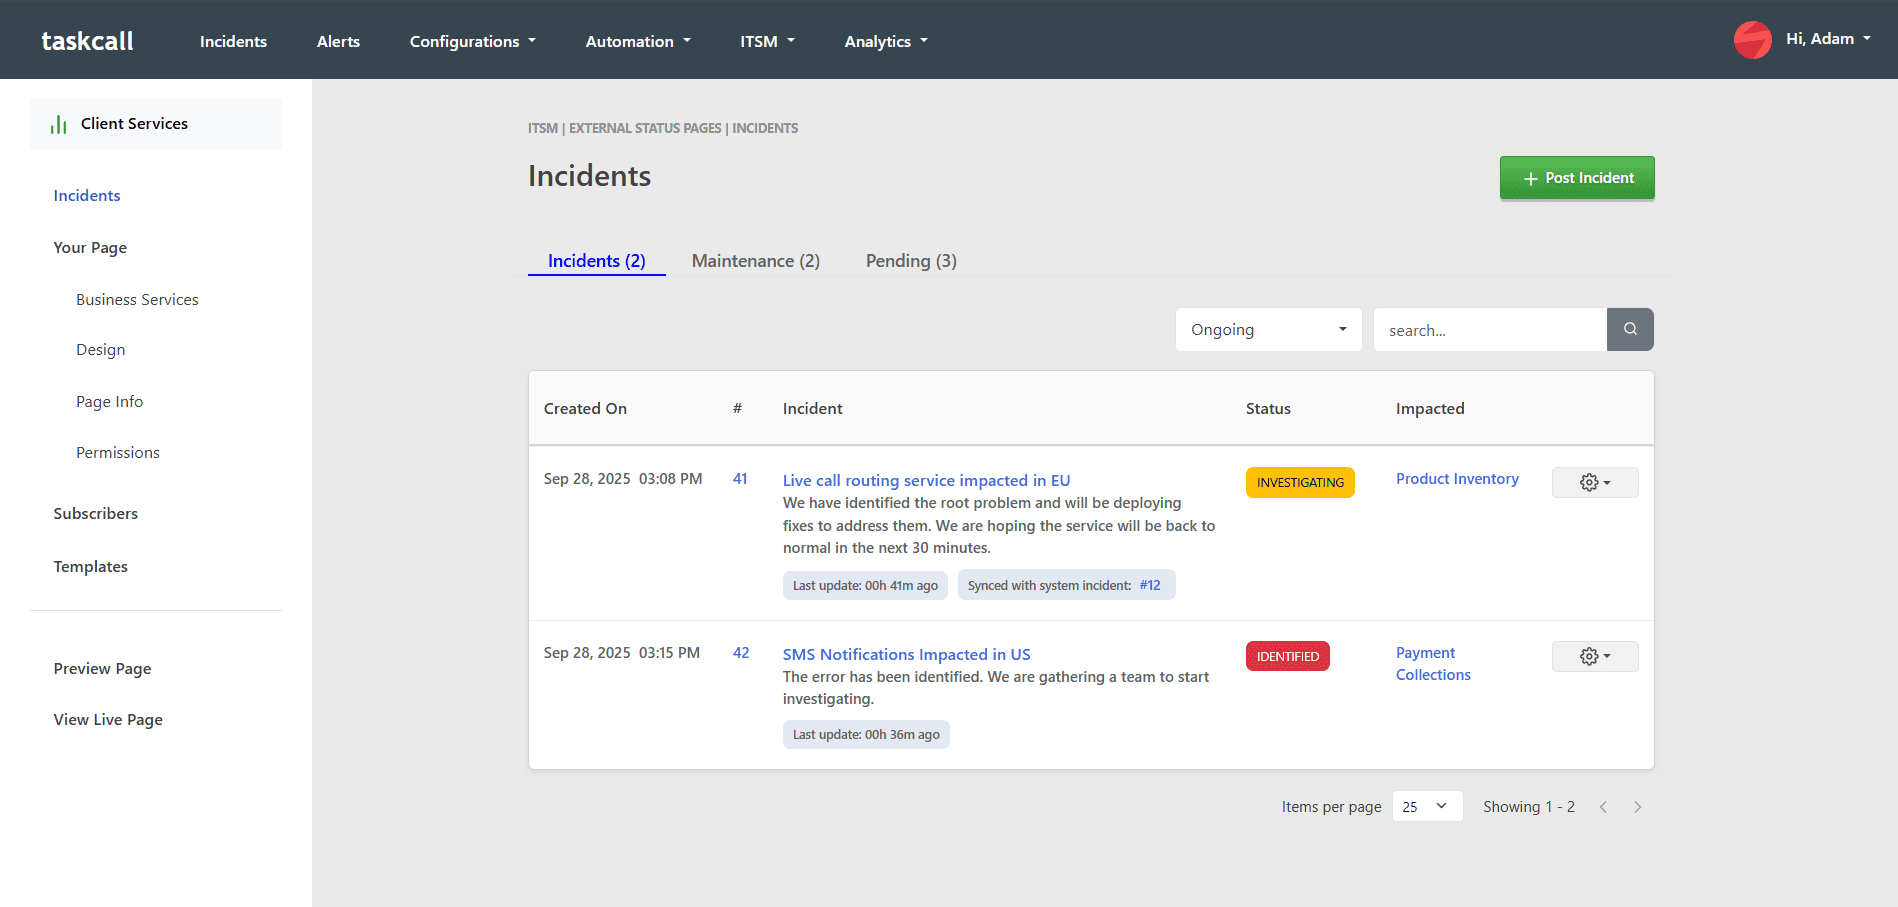
Global navigation on the taskcall web app is handled from the horizontal navigation bar on the top of the page. To make it easier to manage status pages, a separate navigation bar is available on the side of every status page. This allows you to readily move between status page components.
You can also jump between pages by selecting the page you want to go to from the dropdown at the top left corner of the sidebar.
Post Incident
To post an incident,
- Go to the Incidents tab from the navigation sidebar on the Status Page (not the Incidents tab on the global navigation bar). Click Post Incident.
- You can apply a template if you would like or provide the following details:
- Title: The title of the incident.
- Message: Describe what the incident is about and the progress you have made in addressing it.
- Impacted business services: Select the business services that have been impacted and the level of impact on each.
- Status: Set the incident status - Identified, Investigating, Monitoring, Resolved.
- Impact: The impact on your overall service.
- Next update time: (optional) The number of minutes within which the next update will be available.
- Notify subscribers: (optional) Select if you would like to notify subscribers about this incident.
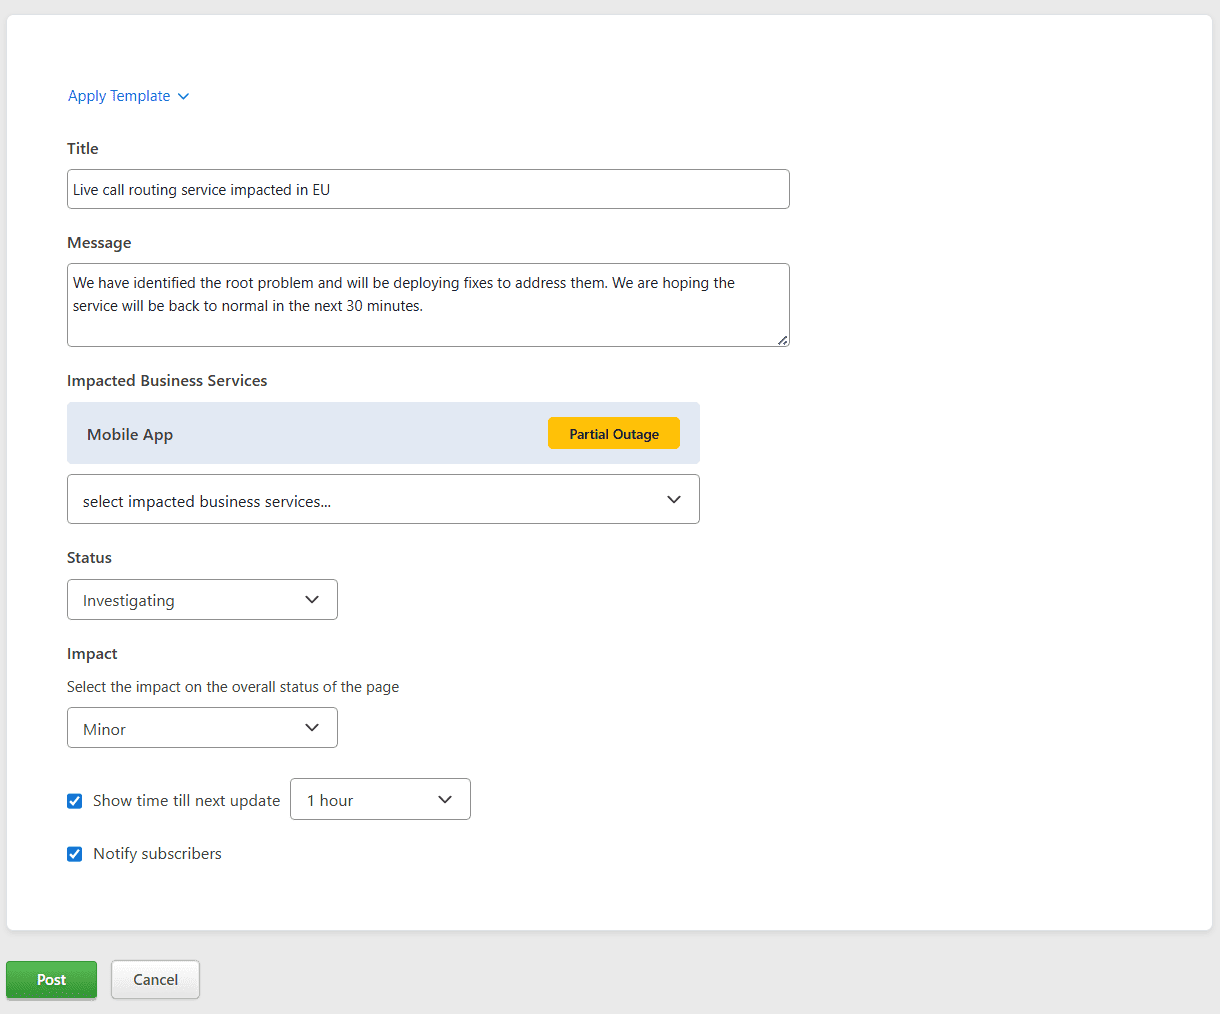
- Click Post. That's it!
If approval is required, then the a notification will be sent to the reviewers. They will be able to review the post from the Pending tab. If prior approval is not required, then the post will be directly published on the status page. Notifications will also be sent out to page subscribers if the option to notify was selected.

Status Updates
Status updates can be posted for incidents. The history of status updates is maintained and displayed to end users so they can track the progress. To post a status update:
- Select the incident you would like to post an update about from the status page Incidents tab.
- Provide the updated information. Click Post.
The title of the post is updated here, then the post will show the new title. If you do not want the title to be updated, then leave the title as it is.
If you want to refer to the previous posts, then click on the Timeline dropdown at the top.
Sync with System Incident
When status page incident posts are created directly from system incidents, they are synced up with that incident. The post automatically updates when a status update is made for the incident or the incident resolves. The same can be achieved for posts that are not created automatically.
To manually sync a post with a system incident:
- Click on the dropdown option next to the status page post you would like to sync with and select Sync with system incident.
- From the modal that opens up, select the system incident you want to sync with and click Save.
Schedule Maintenance
Maintenances can be scheduled ahead of time. They can be viewed from the Maintenance page (from the footer) when the status page is published. They are also automatically displayed on the current status page when they start and the related impacted business services are marked accordingly.
To schedule a maintenance:
- Go to the Maintenance tab from the Incidents page. Click Schedule Maintenance .
- You can apply a template if or provide the following details:
- Title: The title of the maintenance.
- Message: Describe what the maintenance is for.
- Impacted business services: Select the business services that will be impacted.
- Status: Set the status - Scheduled, In Progress, Verifying, Completed.
- Maintenance period: Set the start and end times of the maintenance.
- Notify subscribers: (optional) Select if you would like to notify subscribers about this incident.
- Auto update maintenance: Choose if you would like to automatically update the maintenance post as the maintenance starts and ends. This would post an update saying the maintenance is in progress when the maintenance starts and post another update saying the maintenance completed once the maintenance end time is passed.
- Click Post when you are done.
Apply Templates
You can create incident and maintenance templates to quickly post updates on status pages.
- Go to the Templates tab from the status page sidebar. Click New Template.
- Select the type of template you want to create. Give it a name and a description.
- Provide the default information for the post that will be created when this template is used.
- Click Save.
Manage Subscribers
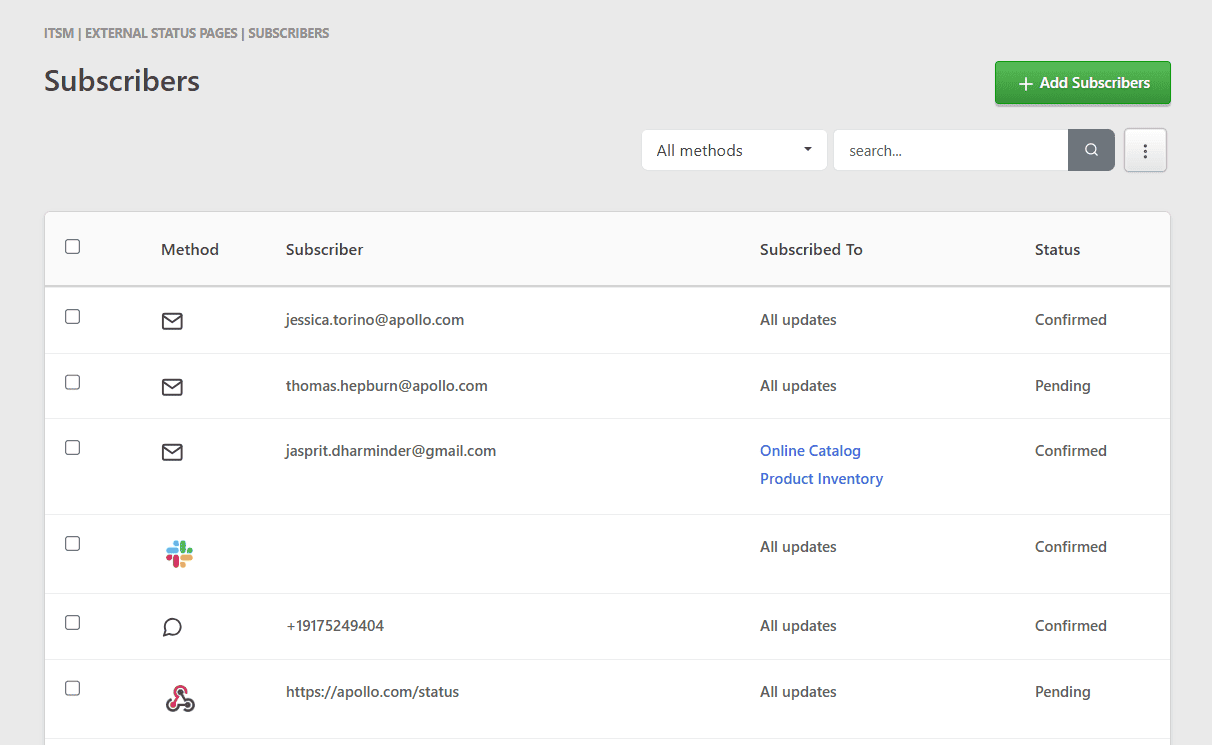
Status page subscribers can be managed from the Subscribers tab on the status page sidebar. While page visitors can self subscribe, you can also add a subscriber directly by selecting the subscription type and the business services they will be subscribed to, and providing their subscription details.
You can also upload multiple subscribers together by uploading a csv file. The file must contain 3 columns - subscription_type, subscriber, services. For the services either enter ALL or the reference ID of each of the business services to subscribe to separated by a comma. Slack subscription is not allowed through file upload.